


Scanning Film: Why Resolution Matters, and How Pixel Shifting Changes the Game
I compared 4 different scanning methods.

Why This Matters
When I first started scanning my own film, it became obvious that while shooting film ispure art, it is the painter's brush, scanning film is pure technology and nerd work, like two very different worlds stitched together. Shooting isemotional, intuitive, and full of imperfections that made it beautiful. Scanning, on the other hand, requires precision, technical choices, and an understanding that if you didn't do it properly, you would be throwing away some of the technicalities you tried so hard to capture.
This question of scanning resolution becomes even more relevant when dealing with 120 film. Medium format negatives are physically larger and carry a much higher level of detail compared to 35mm. A poor medium format scan is like buying a high-end Leica Noctilux lens and installing it into a 1990’s low megapixel camera.
In this post, I want to explore different scanning methods, to see what they preserve, what they lose, and what they reveal, at the most nerdiest pixel-peeping session you will probably ever see in Substack.
The Setup, and Considerations
For this comparison, I will be using:
Camera scanning with a Fujifilm X-H2S at 26 megapixels.
Camera scanning with a Fujifilm X-T5 at 40 megapixels.
Camera scanning with the same Fujifilm X-T5, but using pixel shift to reach around 160 megapixels.
And a dedicated scanner, the PlusTek OpticFilm 8300i.
Although my film holders allow scanning film borders, the Plustek does not, due to that, I won’t be including film borders at allbecause I want to have the same image proportion and no crop at all.
I didn’t even include a flatbed scanner because I don’t have one they are inferior, period.
All the camscanning used the same macro lens, a high-end Fujifilm 80mm macro, with OIS (optical stabilization) disabled both in the sensor and the lens.
Speaking about crop, you will notice that the images are not identically aligned, that’s because I had to move the negative from one setup to another, and when we load negative to scan we always do it a little bit different in terms of rotation. I didn’t want to crop to match them because that would make me lose some pixels, making the comparisons unfair to the cropped images.
The PlusTek will be operated at its maximum advertised resolution. But it is important to state that manufacturers often announce theoretical resolution numbers for scanners that are much higher than what the device can truly deliver in practice. While the 8300i promises an impressive 7200 dpi, the real-world optical sharpness is lower. This is something anyone scanning film should be aware of, especially if resolution is a critical factor in their work. The Plustek OpticFilm 8300i advertises a 7200 dpi optical resolution, producing files up to 68.9 megapixels. However, practical tests and user experiences suggest the effective optical resolution is closer to 3600 dpi. That’s why you are going to see a bigger image size when compared to the FujifilmX-H2S (26mp), but when you go to the detail, the X-H2S kinda performs the same.
For consistency across all comparisons, I will scan each image under the best possible conditions that each method allows. I will also apply the same preset in Negative Lab Pro to all files and try to manually match color balance as much as possible.
I am using the Valoi Easy35 kit for camera scanning.
Now that I added all the considerations, let’s see the results!
Test Results
If you want me to send you all the assets in this post, please send me a message in the chat, and I would be super happy to send you, as well as discuss what you think.

I didn’t embed any images in this post because Substack is doing the Zuckerberg shitshow and compressing images as much as it can, so I had to record a video and post to YouTube. Please watch this in 4K and full-screen.
Results, Observations and Reflections
Spending time with these scans, toggling between the full frames and the detail crops, made one thing clear: At casual viewing sizes and instagram bullshit, the differences are subtle. But under close inspection, the scanning method you choose matters, especially if you want to print larger formats.
The Fujifilm X-H2S delivers a good result for casual use. At 100% crop, fine textures and micro-contrast are slightly blurred.
The Fujifilm X-T5 already improves noticeably over the X-H2S due it’s higher resolution sensor (40mp vs. 26mp). Details such as grain, threads of clothing, and leaf veins become sharper.
🏆 Not surprisingly, the Fujifilm X-T5 with Pixel Shift scan tells a different story. Every grain resolves clearly. Color transitions are smoother. Edges are razor sharp without looking artificial, on a stunning 160 megapixel file with outrageous dimensions (which can be even further enlarged by AI tools like Topaz upscaler). 🏆
The PlusTek OpticFilm 8300i produced results that were decent. However, the softness caused by the scanner's optical limits is visible under close inspection. As you don’t need a camera, macro lens, and the camscanning paraphernalis (light source, film holders, etc.), this scanning method is the most cost-effective, but it accrues some dust over time, requiring constant cleaning, and can be useful for quick and dirty (pun intended) jobs.
We NEED To Talk About Pixel Shifting and Film Scanning
The first person I know that talked about pixel shifting to scan images is my friend Kimi, who professionally works with film photography, and is also a computer nerd like me. Thanks Kimi, you rock, and I am so lucky to have you nearby!
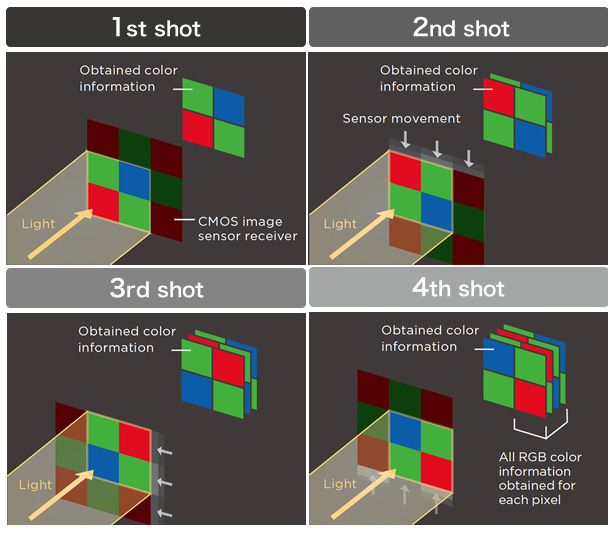
So, pixel shifting is one of those features that many photographers hear about but rarely explore. It works by moving the sensor in microscopic steps between exposures, capturing extra real-world detail and color information, and then merging everything into a single ultra-high-resolution file. It is a technology built around precision, and it demands that both the camera and the subject stay perfectly still. Because of that, pixel shift is often dismissed as impractical for real-world shooting, and it stays buried inside camera menus, forgotten.
But when it comes to film scanning, the story changes completely, it is relevant, EXTREMELY relevant, as a negative locked firmly into a carrier is the perfect use case due to the stability, precision, and stillness, which are naturally met when scanning film.
By combining camera scanning and pixel shifting, you can achieve a level of scanning performance that makes camera scanning extremely competitive with digital medium format cameras without the extraordinary cost, which is awesome.
Buying a modern medium format digital system can easily cost ten thousand dollars or more. Meanwhile, with the right film scanner setup, a pixel-shifting camera, and a good workflow, you can reveal an enormous amount of detail from your 120 negatives.
And yet, strangely, very few voices in the film community talk about this.
In this comparison, I want to explore that potential — and show why scanning film carefully, intelligently, and at the highest resolution you can achieve is not just a technical choice. It is a creative one.
Closing Thoughts and Next Steps
This points to an exciting future.
If a 40MP APS-C sensor with pixel shift can already rival or surpass dedicated scanners, imagine what a medium format digital camera — equipped with pixel shifting — could achieve.
By using a medium format digital camera (such as the Fujifilm GFX series) combined with pixel shift scanning, it is possible have 400 megapixel files and outperform legendary scanners like the Nikon CoolScan 9000 ED or drum scanners in several aspects of raw detail capture, according to my research. Not to mention that you can easily scan film borders, which is a burden with dedicated scanners (but not flatbed).
Now, this? This, my friends, is a new frontier (pun mega intended…).